If you want to make a real-time angular application. I give A Streaming Audio Player application tutorial. I think you will be very enjoy this tutorial.
Introduction
This app is developed with JavaScript technology. here you can manage JavaScript Audio objects and Angular Material using UI(User Interface). From UI we can manage Audio States.
Prerequisites
When you will be start any angular project first you need a NodeJS Environment in your system. After that, you need Angular CLI (Command Line Interface).
npm install -g @angular/cli
If you are using Linux or Mac OS System then you will be writing sudo before the command.
Application Project Creation:
Now we need to create a Project Scaffolding.
ng new AudioProject
After then getting Two questions.
- Would you like to add Angular routing? (y/N): You can input
N(no) as you are going to use Angular Routing in the app. - Which stylesheet format would you like to use? (Use arrow keys): Select
SCSSfrom the options given.
Running The Project
First need to go project folder cd AudioProject using this command. Then we will run our basic application npm start using this command. After that, you will get the default interface on your browser using http://localhost:4200 this URL address.
Installing Angular Material UI
If the project works fine. then we need to install angular material dependency in our project.
ng add @angular/material
after this command, you will get these questions.
- Choose a pre-built theme name, or “custom” for a custom theme: Choose
Indigo/Pink - Set up browser animations for Angular Material? (Y/n): you can input
y(yes) again because you will need animation.
Here we need another dependency moment.js to manipulate dates and times. Install it via npm:
npm install --save moment
Audio Player UI creates by Angular Material
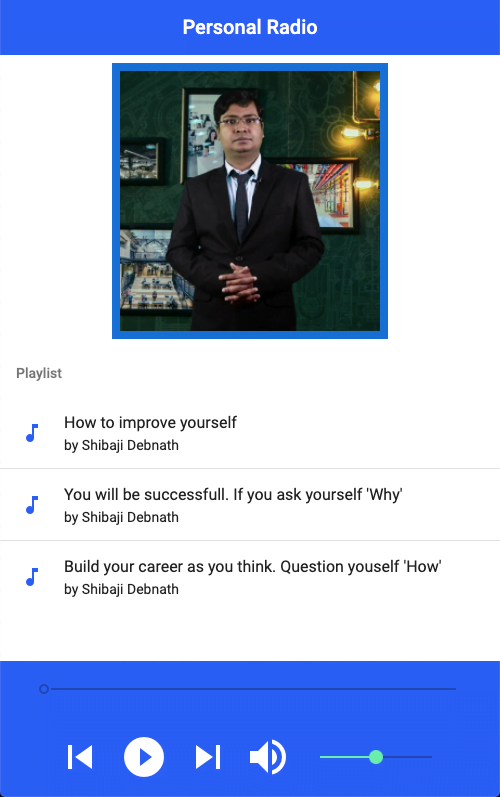
In this section, you will design the UI of the application. In the end, your application will look like this:
First, need to Add Material Modules in app.module.ts. Follow The Procedure first we need another module called material.module.ts. Use this command
ng generate module material --flat
–flat flag is important for non-directory module creation. then write the code:
Go to the SRC folder and then open the app folder and Write these codes in
metarial.module.ts
import { NgModule } from '@angular/core';
import { MatButtonModule } from '@angular/material/button';
import { MatListModule } from '@angular/material/list';
import { MatSliderModule } from '@angular/material/slider';
import { MatIconModule } from '@angular/material/icon';
import { MatToolbarModule } from '@angular/material/toolbar';
import { MatCardModule } from '@angular/material/card';

const modules = [
  MatButtonModule,
  MatListModule,
  MatSliderModule,
  MatIconModule,
  MatToolbarModule,
  MatCardModule
];

@NgModule({
  imports: modules,
  exports: modules
})
export class MaterialModule { }
app.component.html
<div class="container">
<mat-toolbar color="primary" class="main-toolbar">
<span>Personal Radio</span>
</mat-toolbar>
<div class="content">
<div class="logo">
<img src="assets/image1.jpg" alt="Shibaji Debnath" width="260px">
</div>
<mat-list color="primary">
<h3 mat-subheader="">Playlist</h3>
<div class="song-list">
<mat-list-item *ngfor="let file of files; let i = index" (click)="openFile(file, i)">
<mat-icon color="primary" mat-list-icon="">music_note</mat-icon>
<h4 mat-line="">{{ file.name }}</h4>
<h5 mat-line="">by {{ file.artist }}</h5>
<mat-icon color="primary" *ngif="currentFile.index === i && !state?.error">volume_up</mat-icon>
<h6 *ngif="currentFile.index === i && state?.error">ERROR</h6>
<mat-divider></mat-divider>
</mat-list-item>
</div>
</mat-list>
</div>
<div class="spacer"></div>
<div class="media-footer">
<mat-toolbar color="primary">
<mat-toolbar-row>
{{ state?.readableCurrentTime }}
<mat-slider class="time-slider" min="0" [max]="state?.duration" step="1" [value]="state?.currentTime" (input)="onSliderChangeEnd($event)" [disabled]="state?.error || currentFile.index === undefined"></mat-slider>
{{ state?.readableDuration }}
</mat-toolbar-row>
<mat-toolbar-row cols="2" class="media-action-bar">
<button mat-button="" [disabled]="isFirstPlaying()" (click)="previous()">
<mat-icon mat-list-icon="">skip_previous</mat-icon>
</button>
<button mat-button="" (click)="play()" [disabled]="state?.error" *ngif="!state?.playing">
<mat-icon mat-list-icon="">play_circle_filled</mat-icon>
</button>
<button mat-button="" (click)="pause()" *ngif="state?.playing">
<mat-icon mat-list-icon="">pause</mat-icon>
</button>
<button mat-button="" [disabled]="isLastPlaying()" (click)="next()">
<mat-icon mat-list-icon="">skip_next</mat-icon>
</button>
<span class="spacer"></span>
<mat-icon>volume_up</mat-icon>
<mat-slider class="time-slider" min="0" max="1" step="0.01" [value]="state?.volume" (input)="onVolumeChange($event)"></mat-slider>
</mat-toolbar-row>
</mat-toolbar>
</div>
</div>app.component.scss
.container {
    .main-toolbar {
      justify-content: center;
      .spacer {
        flex: 1 1 auto;
      }
      .toolbar-btn {
        font-size: 16px;
        margin-right: 5px;
        cursor: pointer;
      }
    }

    .content {
      .logo {
        margin: 0.5rem;
        text-align: center;
        font-size: 24px;
        color: #0471d6;
        img{
          background-color: #0471d6;
          padding: .5rem;
        }
        .mat-icon {
          height: 160px !important;
          width: 160px !important;
          font-size: 160px !important;
        }
      }
      .song-list{
        height: 200px;
        overflow: scroll;
      }
    }

    .media-footer {
      position: fixed;
      bottom: 0;
      width: 100%;
      .spacer {
        width: 200%;
      }
      .time-slider {
        width: 100% !important;
        margin-left: 20px;
        margin-right: 20px;
      }
      .media-action-bar {
        width: 100%;
        padding: 2.5rem;
        justify-content: center;
        .mat-icon {
          height: 48px !important;
          width: 48px !important;
          font-size: 48px !important;
        }
      }
   }
}
After writing these codes we need to create an AudioService class using the angular command
ng generate service services/audio
Here we are creating an HtmlAudio object and Manipulate with RXJS classes and functions. See The codes.
Here we need moment js. This is a third-party library for Time Format support. so it needs to be installed from the npm server.
npm install moment --save
audio.service.ts
import { Injectable } from '@angular/core';
import { Observable, BehaviorSubject, Subject } from "rxjs";
import { takeUntil } from "rxjs/operators";
import * as moment from "moment";
import { StreamState } from '../interfaces/stream-state';
@Injectable({
providedIn: 'root'
})
export class AudioService {
private state: StreamState = {
playing: false,
readableCurrentTime: '',
readableDuration: '',
duration: undefined,
currentTime: undefined,
volume: 0.5,
canplay: false,
error: false,
};
private stop$ = new Subject();
private audioObj = new Audio();
audioEvents = [
"ended",
"error",
"play",
"playing",
"pause",
"timeupdate",
"canplay",
"loadedmetadata",
"loadstart"
];
private stateChange: BehaviorSubject<streamstate> = new BehaviorSubject(
this.state
);
constructor() {
}
private updateStateEvents(event: Event): void {
switch (event.type) {
case "canplay":
this.state.duration = this.audioObj.duration;
this.state.readableDuration = this.formatTime(this.state.duration);
this.state.canplay = true;
break;
case "playing":
this.state.playing = true;
break;
case "pause":
this.state.playing = false;
break;
case "timeupdate":
this.state.currentTime = this.audioObj.currentTime;
this.state.readableCurrentTime = this.formatTime(
this.state.currentTime
);
break;
case "error":
this.resetState();
this.state.error = true;
break;
}
this.stateChange.next(this.state);
}
private resetState() {
this.state = {
playing: false,
readableCurrentTime: '',
readableDuration: '',
duration: undefined,
currentTime: undefined,
volume: 0.5,
canplay: false,
error: false
};
}
getState(): Observable<streamstate> {
return this.stateChange.asObservable();
}
private streamObservable(url) {
return new Observable(observer => {
// Play audio
this.audioObj.src = url;
this.audioObj.load();
this.audioObj.play();
const handler = (event: Event) => {
this.updateStateEvents(event);
observer.next(event);
};
this.addEvents(this.audioObj, this.audioEvents, handler);
return () => {
// Stop Playing
this.audioObj.pause();
this.audioObj.currentTime = 0;
// remove event listeners
this.removeEvents(this.audioObj, this.audioEvents, handler);
// reset state
this.resetState();
};
});
}
private addEvents(obj, events, handler) {
events.forEach(event => {
obj.addEventListener(event, handler);
});
}
private removeEvents(obj, events, handler) {
events.forEach(event => {
obj.removeEventListener(event, handler);
});
}
playStream(url) {
return this.streamObservable(url).pipe(takeUntil(this.stop$));
}
play() {
this.audioObj.play();
}
pause() {
this.audioObj.pause();
}
stop() {
this.stop$.next();
}
seekTo(seconds) {
this.audioObj.currentTime = seconds;
}
setVolume(volume) {
this.audioObj.volume = volume;
}
formatTime(time: number, format: string = "HH:mm:ss") {
const momentTime = time * 1000;
return moment.utc(momentTime).format(format);
}
}Finally, we need a Cloud Audio list. So we need a CloudService class. So we will use this angular command.
ng generate service services/cloud
cloud.service.ts
import { Injectable } from '@angular/core';
import { of } from "rxjs";

@Injectable({
  providedIn: 'root'
})
export class CloudService {
  files: any = [
    // tslint:disable-next-line: max-line-length
    {
      url:"https://s3-us-west-2.amazonaws.com/anchor-audio-bank/staging/2020-02-19/d658d0c51440a105d3b5708ec5cbfea1.m4a",
      name: "How to improve yourself",
      artist: "Shibaji Debnath"
    },
    {
      url:"https://s3-us-west-2.amazonaws.com/anchor-audio-bank/staging/2020-03-05/6295d331c4f0a5a77c54c391ee76aabf.m4a",
      name:"You will be successfull. If you ask yourself 'Why'",
      artist: "Shibaji Debnath",
    },
    {
      url:"https://s3-us-west-2.amazonaws.com/anchor-audio-bank/staging/2020-02-03/648e6a1cf78f0005ab9b127bd81e6bfc.m4a",
      name: "Build your career as you think. Question youself 'How'",
      artist: "Shibaji Debnath"
    }
  ];

  constructor() { }

  getFiles() {
    return of(this.files);
  }
}
After writing all these codes. open the assets folder there put image1.jpg a named picture. Then Finally Run the development server using
npm start
You can view the live demo: Link
ScreenShot


