Now a days every business and individuals need their own website. So website design has become a trend and has immense scope for developers and designers in this field. Here in this post I am going to show you how to create a basic website template design in HTML & CSS. This will be helpful if you want to build your own website from scratch or learning web designing and want to pursue your career as a web designer.
Before starting here I want to tell you one thing first you need to have some basic design concepts (which I believe most of the people have) and a graphics design tool software. In the graphics designing tools part most people use 2 software, if you can pay for the software then use Adobe Photoshop or if you want to go for free open source software then you can use GIMP. Both these software are to each other and meets our requirement.
Here we will do this with few easy steps, which are as follows:
Step 1. Basic Design Layout

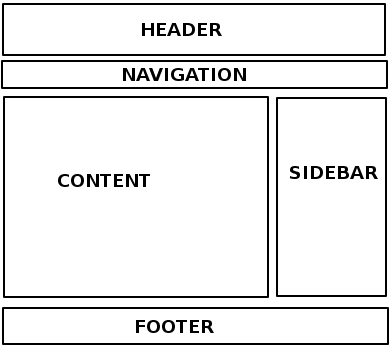
Layout 1

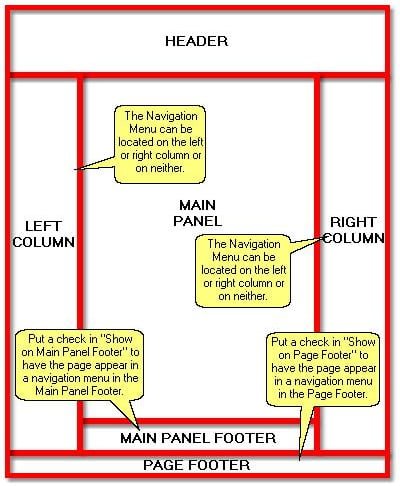
Layout 2
As you can see two layouts is being presented here. You can choose any one of them based on your requirement to start with. Layout 1 is little easier and less complex than the layout 2.
After selecting the basic layout you can work on it to design and make it more appealing to users by using any graphics tools. This will depend upon your requirement, design skills and time.
Step 2: Web Page Structure with HTML
So lets start.
Main HTML Part
<!DOCTYPE html>
<html>
<head>
<title>MY First HTML Page</title>
<style> <!— Our CSS Codes goes here —> </style>
</head>
<body>
<!— Our Templates HTML Codes goes here —>
</body>
</html>
Here I have shown you a basic structure of a HTML page, where you can find few tags are there. I explain them below.
<!DOCTYPE html> – It is used to declare the HTML document format. If we use this doctype then the browser will know that this file is in HTML5 format.
<html> ... </html> – This tag used to wrap all html elements in it.
<head> ... </head> – This tag is used to wrap the necessary information about the document, like which other files(CSS, JS) need to include, title, meta tags definition of the document.
<title> ... </title> – Under this tag we mention the title of the page.
<body> ... </body> – All visual elements of the page will go under this tag.
To create a basic template we don’t need to know much more about HTML tags. Actually most of the work can be done with div tag.
Main Elements under body tag
<div class=“container”>
<!— Header Area —>
<div class=“header”>
<h1> My Company Logo</h1>
</div>
<!— Navigation Area —>
<div class=“navigation”>
<ul>
<li> <a href=“#”>Home</a> </li>
<li> <a href=“#”>About Us</a> </li>
<li> <a href=“#”>Services</a> </li>
<li> <a href=“#”>Contact Us</a> </li>
</ul>
</div>

<!— Main Contents Area —>
<div class=“main-contents”>
<div class=“left-column”> Left Column </div>
<div class=“main-panel”> Main Panel </div>
<div class=“right-column”> Right Column </div>
</div>

<!— Footer Area —>
<div class=“footer”>
<p class=“footer-nav”> <a href=“#”>Home</a> | <a href=“#”>About</a> | <a href=“#”>Services</a> | <a href=“#”>Contact</a></p>
<p class=“copyright”> Copyright By My Website</p>
</div>
</div>
Here we have added a class with all div elements which we will use later to design the page by using CSS and <!-- Something goes here --> is used to make comments within coding.
Step 3: Design the page with CSS
* {
padding: 0px;
margin: 0px;
}

.container {
width: 998px;
margin-left: auto;
margin-right: auto;
}

.header {
height: 100px;
text-align: center;
}

.navigation {
height: 40px;
line-height: 40px;
background-color: #660000;
color: #ffffff;
}

.navigation ul {
padding: 5px;
}

.navigation li {
float: left;
width: 100px;
padding: 5px;
margin: 2px;
border: 1px solid #330000;
}

.navigation li a {
color: #ffffff;
text-decoration: none;
}

.main-contents {
padding: 5px;
height: 500px;
}

.left-column {
float: left;
width: 200px;
height: 500px;
background-color: #ffffcc;
}

.main-panel {
float: left;
width: 980px;
height: 500px;
}

.right-column {
float: right;
width: 200px;
height: 500px;
background-color: #ffffcc;
}

.footer {
padding: 10px;
}

.footer-nav {
text-align: center;
}

.copyright {
text-align: center;
}
This is the CSS code for the HTML document which I have shown you earlier and this code will take place in the style tag in main HTML part section within the head tag. Here we have defined the attributes within curly braces for each class and elements of the html.
This is it. With this little effort you can create a basic HTML web page template.


